该系列用于探索一些 Angular 中灵活或者新的用法。本文讲述封装动态列表,通过配置文件生成列表的过程。
# 动态列表
# 基本功能
前面我们花了很大的篇幅来制作动态表单的生成和配置,这里我们将制作动态列表的生成。 动态列表相对简单,这里我们提供以下功能:
- 创建
- 编辑
- 删除
- 查看(默认)
前面的增删改则是可选的,我们通过配置来定义包含的功能:
export interface IListConfig {
    function: string[]; // ['add', 'edit', 'remove']
    content: IList[]; // 列表展示内容
}
这里面有个列表展示内容,通常我们的列表除了基本的序号列和操作列,其余的我们都会需要以下的参数:
export interface IList {
    title: string; // 列名
    key: string; // 该列数据对应的key
}
# html模版
通常本骚年创建一些模块或是组件,会先从html模版开始,我们把期望的样子列出来,就能知道还缺哪些功能啦。
- 列表
<a class="btn btn-info" *ngIf="hasFunction('add')" (click)="edit(-1)">新建</a>
<div class="row" *ngIf="(listConfig && listConfig.content && listConfig.content.length)">
    <div class="col-md-6">
        <table class="table table-bordered table-striped">
            <thead>
            <tr>
                <th>序号</th>
                <th *ngFor="let li of listConfig.content">{{li.title}}</th>
                <th *ngIf="hasFunction('edit') || hasFunction('remove')">操作</th>
            </tr>
            </thead>
            <tbody>
            <tr *ngFor="let data of dataModel; let i = index;">
                <td>{{i+1}}</td>
                <td *ngFor="let li of listConfig.content">{{data[li.key]}}</td>
                <td *ngIf="hasFunction('edit') || hasFunction('remove')">
                    <a class="btn btn-default" *ngIf="hasFunction('edit')" (click)="edit(i)">编辑</a>
                    <a class="btn btn-danger" *ngIf="hasFunction('remove')" (click)="dataModel.splice(i, 1)">删除</a>
                </td>
            </tr>
            </tbody>
        </table>
    </div>
</div>
这里我们可以看出:
hasFunction(): 检测是否有某功能并显示listConfig: 列表配置,格式符合以上IListConfigedit(): 编辑或新建功能,新建传入参数-1dataModel: 列表的内容
- 编辑对话框
我们还需要一个编辑对话框,里面是之前封装好的动态表单,故我们还需要创建一个表单配置ICustomControl[]。
<div class="modal" *ngIf="hasFunction('edit') || hasFunction('add')" [hidden]="!isShown">
<div class="modal-dialog" role="document">
<div class="modal-content">
<div class="modal-header">
<button type="button" class="close" data-dismiss="modal" aria-label="Close" (click)="isShown = false;"><span aria-hidden="true">×</span></button>
<h4 class="modal-title">{{isEdit > -1 ? '编辑' : '新建'}}</h4>
</div>
<div class="modal-body">
<dynamic-form *ngIf="isShown" [config]="formConfig" [(model)]="formModel"></dynamic-form>
</div>
<div class="modal-footer">
<button type="button" class="btn btn-default" data-dismiss="modal" (click)="isShown = false;">取消</button>
<button type="button" class="btn btn-primary" [disabled]="!formModel.valid" (click)="save()">保存</button>
</div>
</div>
</div>
</div>
这里我们知道:
isShown: 控制对话框显示,以及动态表单的创建hasFunction(): 同上,检测是否有某功能并显示save(): 保存修改或新建formConfig: 动态表单的配置
# js逻辑
通过上面的模版,我们大概知道需要哪些功能:
@Component({
    selector: 'dynamic-list',
    templateUrl: './dynamic-list.component.html',
})
export class DynamicListComponent {
    // 需要输入以下配置内容,其中dataModel和formModel可选
    @Input() listConfig: IListConfig;
    @Input() formConfig: ICustomControl[] = [];
    @Input() dataModel: any = [];
    @Input() formModel: any = [];

    isShown: boolean = false; // 对话框显示
    isEdit: number = -1; // 正在编辑的index,新建为-1

    // 判断是否有某个功能['add', 'edit', 'remove']
    hasFunction(fun: string) {
        if (this.listConfig && this.listConfig.function) {
            return this.listConfig.function.indexOf(fun) > -1;
        }
        return false;
    }

    // 编辑,传入-1为新建
    edit(index: number) {
        this.isEdit = index;
        if (index > -1) {
            // 深度拷贝对象
            this.formModel = ObjectCopy(this.dataModel[index]);
        } else {
            this.formModel = {};
        }
        this.isShown = true;
    }

    // 保存修改,若新建则添加
    save() {
        // 深度拷贝对象
        const model = ObjectCopy(this.formModel);
        if (this.isEdit > -1) {
            this.dataModel[this.isEdit] = model;
        } else {
            this.dataModel.push(model);
        }
        this.isShown = false;
    }
}
至于针对对象的深拷贝,其实也不是很难的:
export function ObjectCopy(newObj) {
    const obj = Object.assign({}, newObj);
    if (newObj) {
        Object.keys(newObj).map(key => {
            // 当obj里面有对象时,则递归拷贝
            if (newObj[key] && !(newObj[key] instanceof Array) && typeof newObj[key] === 'object') {
                obj[key] = ObjectCopy(newObj[key]);
            } else {
                obj[key] = newObj[key];
            }
        });
    }
    return obj;
}
# 实例演示
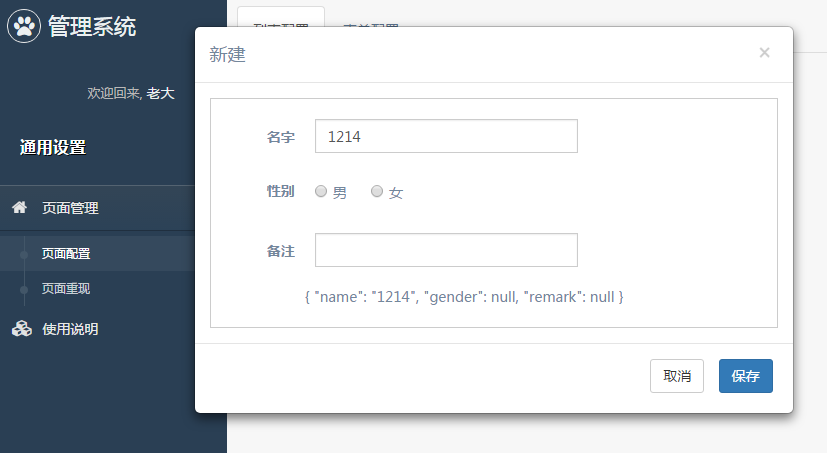
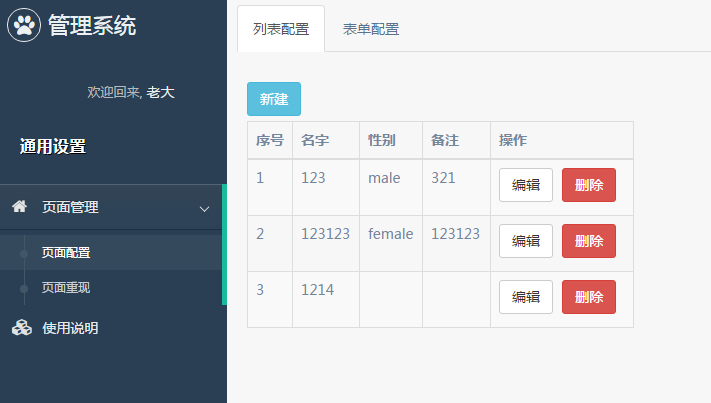
这里假设我们需要以下这样的列表:
- 可进行增删查改。
- 包括名字、性别和备注。
我们的配置文件如下:
// 对话框表单配置
export const formConfig: ICustomControl[] = [
    {
        type: 'text',
        label: '名字',
        key: 'name',
        validations: [{
            type: 'required',
            message: '名字必填'
        }]
    }, {
        type: 'radio',
        label: '性别',
        key: 'gender',
        options: [
            {id: 'male', text: '男'},
            {id: 'female', text: '女'}
        ]
    }, {
        type: 'text',
        label: '备注',
        key: 'remark'
    }
];
// 列表配置
export const listConfig: IListConfig = {
    function: ['add', 'edit', 'remove'],
    content: [{
        key: 'name',
        title: '名字'
    }, {
        key: 'gender',
        title: '性别'
    }, {
        key: 'remark',
        title: '备注'
    }]
};
这里我们需要主要的是,若希望编辑或创建的对象在列表中能展示,需要两者的key值一致。 效果图如下:
# 结束语
项目中表单配置部分大致的实现也是差不多告一段落啦,后面可能更多的是补充和优化而已。
而其实项目还可以多种拓展呢,像这样的添加配置像(validations和hiddenWhen)也可以通过抽象做成更加通用的功能。
此处查看项目代码 (opens new window)
此处查看页面效果 (opens new window)
