该系列用于探索一些 Angular 中灵活或者新的用法。本文结合上一节讲的响应式表单表单,记录创建动态表单的过程。
# 响应式表单
# 上节回顾
上一节《6. 模型驱动和模板驱动的表单》中有介绍我们创建响应式表单,大家也应该知道响应式表单的灵活性、同步性、测试性都比模板驱动表单要好。
这里先简单回顾一下:
- 在 html 模板中
form元素需添加formGroup属性,其关联到form元素上的FormGroup实例- 每个表单控件只需添加
formControlName属性,来绑定FormGroup对应的的控件名 - 使用
ngSubmit可触发表单提交 - 使用
FormGroup实例的valid属性可获取表单的校验状态
- 在 js 中
- 需要引入
ReactiveFormsModule,来使用模型驱动的一些模板语法 FormGroup用于注册多个FormControlFormBuilder类能通过处理控件创建的细节问题来帮我们减少重复劳动valueChanges可以订阅表单控件变化
然后我们开始将它整理为一个可动态生成的表单吧。
# 动态表单
# HTML 模板
首先,我们需要定义我们要生成怎样的表单。
这里暂时只考虑两种:<input>以及<select>。
对于<input>元素,我们只需要一个formControlName属性,剩下的通过响应式处理。
对于<select>元素,我们除了formControlName属性,还需提供option选项的内容。
然后通过响应式处理,我们可以统一获取各自的错误提示,后面我们会讲到。目前我们可以获得代码:
<form
  class="form-horizontal"
  [formGroup]="dynamicForm"
  (ngSubmit)="submit()"
  style="border: solid 1px #ccc; padding: 20px 0;"
>
  <div *ngFor="let control of customForms" class="form-group">
    <div class="form-group">
      <label class="col-md-2 control-label">{{control.label}}</label>
      <div class="col-md-6">
        <input
          *ngIf="control.type === 'input'"
          class="form-control"
          [formControlName]="control.key"
        />
        <select
          *ngIf="control.type === 'select'"
          class="form-control"
          [formControlName]="control.key"
        >
          <option *ngFor="let op of control.options" [value]="op.id"
            >{{op.text}}</option
          >
        </select>
      </div>
    </div>
    <div
      *ngIf="formErrors[control.key]"
      class="alert alert-danger col-md-6 col-md-offset-2"
    >
      <p>{{ formErrors[control.key] }}</p>
    </div>
  </div>
  <div class="col-md-offset-2">
    {{dynamicForm.value | json}}
  </div>
  <div class="form-group">
    <div class="col-sm-offset-2 col-sm-10">
      <button
        [disabled]="!dynamicForm.valid"
        type="submit"
        class="btn btn-info"
      >
        提交
      </button>
    </div>
  </div>
</form>
可见,我们通过customForms来设定所有的表单控件,其中每个控件:
type为控件类型,字符串表示key为唯一标识,字符串表示options为选项,为{id:id, text: text}组成的数组
# 接口定义
在我们的响应式表单中,有个很重要的校验,这里我们使用validations来保存每个控件的校验:
type为校验类型,包括'required'/'maxLength'/'minLength'/'email'/'pattern'等,具体参考Validatorsparam为参数,像'maxLength'可带 Number 的参数,'pattern'可带正则字符串,同样参考Validatorsmessage为错误提示
到这里我们的控件主要包括以下内容:
// validation接口
interface IValidations {
  type: string;
  param?: any;
  message: string;
}

// option接口
interface IOptions {
  id: string;
  text: string;
}

// 控件接口
interface ICustomControl {
  type: string;
  label: string;
  key: string;
  validations?: IValidations[];
  options?: IOptions[];
}
# 逻辑实现
到了这里,我们的基本数据结构定义完毕了,我们则可以通过这个数据结构生成需要的数据,包括:
FormGroup: 包括每个FormControl控件的细节控制model: 表单的控件 model 集合formErrors: 表单控件校验总错误信息集合validationMessages: 表单控件单个错误信息集合
结合上一节内容,调整后我们的代码:
@Component({
    selector: 'dynamic-form',
    templateUrl: './dynamic-form.component.html',
})
export class CustomFormComponent {
    @Input() config: any; // 保存配置内容
    customGroup: any = {}; // 用于创建FormGroup
    model: any = {}; // 保存每个控件值的model,主要用于提交等
    dynamicForm: FormGroup; // FormGroup

    formErrors = {};
    validationMessages = {};

    constructor(private fb: FormBuilder) { }

    ngOnInit() {
        // 遍历配置中的控件
        this.config.forEach((control: ICustomControl, i) => {
            // 初始化控件错误信息
            this.formErrors[control.key] = '';
            this.validationMessages[control.key] = {};
            // 初始化model,若有初始值可在这里处理
            this.model[control.key] = undefined;
            // 校验器设置
            const validations = [];
            control.validations.forEach((valid: IValidations) => {
                this.validationMessages[control.key][valid.type.toLowerCase()] = valid.message;
                if (valid.param) {
                    // 若有参数,则作为函数调用参数
                    validations.push(Validators[valid.type](valid.param));
                } else {
                    validations.push(Validators[valid.type]);
                }
            });
            this.customGroup[control.key] = [this.model[control.key], validations];
        });
        this.createForm();
    }

    createForm() {
        // 有多个FormControl,把它们注册进一个父FormGroup中
        this.dynamicForm = this.fb.group(this.customGroup);
        // 监听变化,更新校验信息
        this.dynamicForm.valueChanges
            .subscribe(data => this.onValueChanged(data));
        this.onValueChanged(); // 更新校验信息
    }

    onValueChanged(data?: any) {
        if (!this.dynamicForm) {
            return;
        }
        const form = this.dynamicForm;
        for (const field in this.formErrors) {
            // 清除控件错误信息
            this.formErrors[field] = '';
            const control = form.get(field);
            if (control && control.dirty && !control.valid) {
                const messages = this.validationMessages[field];
                for (const key in control.errors) {
                    this.formErrors[field] += messages[key] + ' ';
                }
            }
        }
    }

    submit() {
        // 赋值model,可用于修改提交
        this.model = {...this.dynamicForm.value};
        console.log(this.model);
        alert('成功!');
    }
}
# 注入配置
我们可以模拟一个配置文件,注入到这个动态表单控件中:
export const customForms: ICustomControl[] = [
  {
    type: "input",
    label: "名字",
    key: "name",
    validations: [
      {
        type: "required",
        message: "名字必填"
      },
      {
        type: "maxLength",
        param: 8,
        message: "名字最多8个字符"
      },
      {
        type: "minLength",
        param: 3,
        message: "名字最少3个字符"
      }
    ]
  },
  {
    type: "input",
    label: "Email",
    key: "email",
    validations: [
      {
        type: "required",
        message: "Email必填"
      },
      {
        type: "email",
        message: "Email格式不正确"
      }
    ]
  },
  {
    type: "select",
    label: "职业",
    key: "job",
    validations: [
      {
        type: "required",
        message: "职业必选"
      }
    ],
    options: [
      { id: "", text: "" },
      { id: "1", text: "医生" },
      { id: "2", text: "程序员" },
      { id: "3", text: "公务员" },
      { id: "4", text: "其他" }
    ]
  }
];
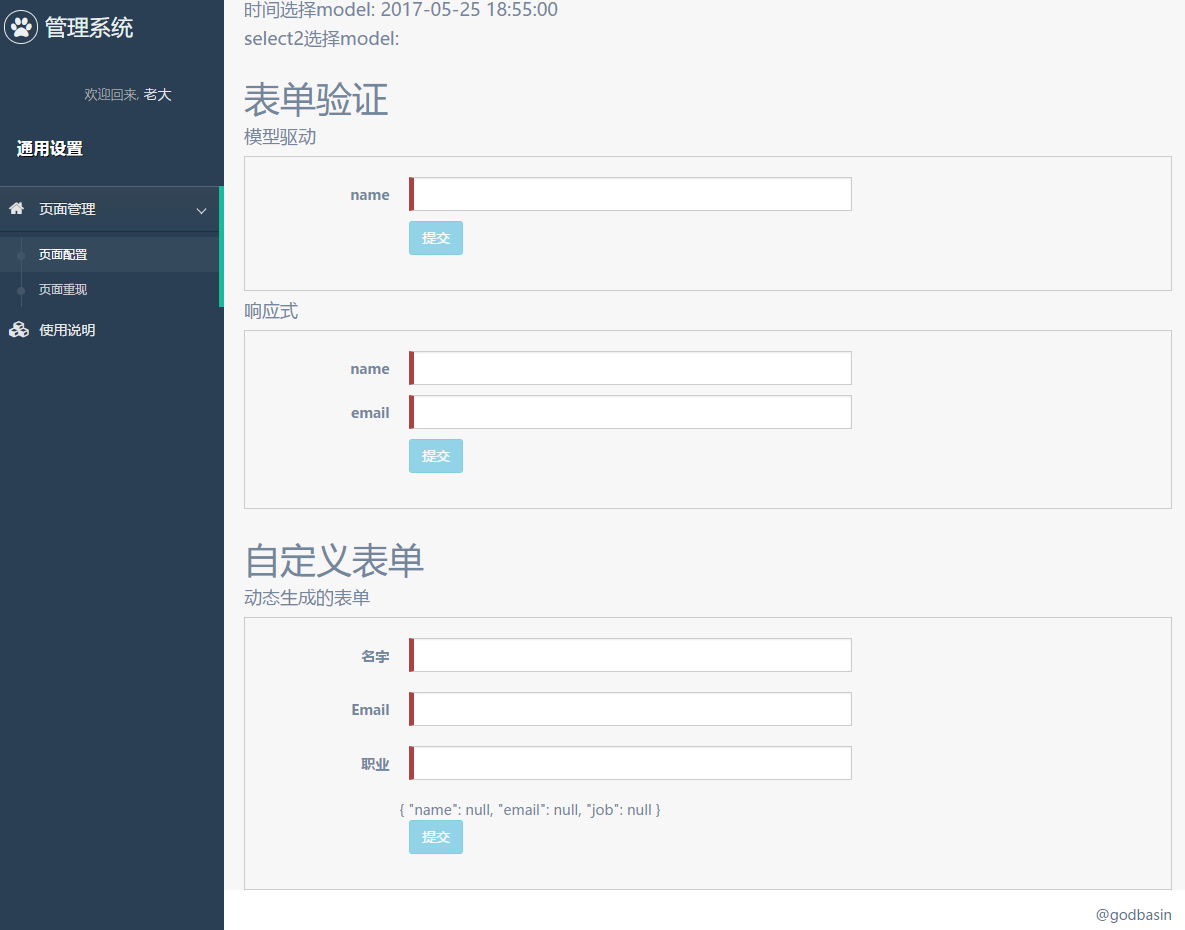
可以看到最终效果图:
# 结束语
本节我们将之前的响应式表单进行改造,做成了动态表单,通过配置去生成我们需要的表单,包括校验等等。
这里只是个基本雏形,后面若需要完善,例如表单的初始化状态加载,或是其他类型表单的拓展,也是需要花些心思的呢。
此处查看项目代码 (opens new window)
此处查看页面效果 (opens new window)
